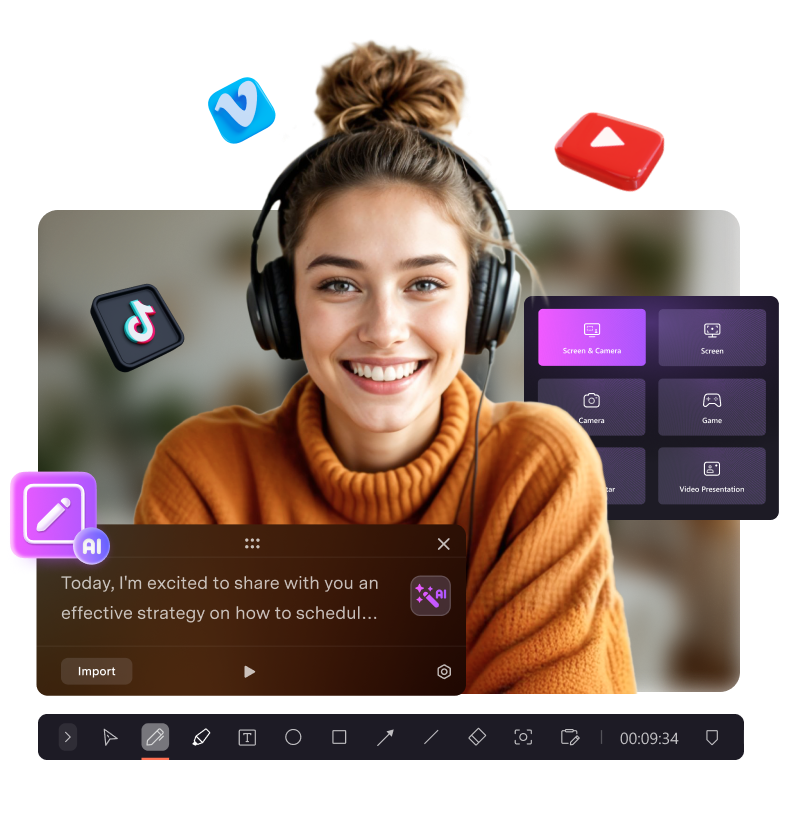
Ya mfeni

+

Contenido

2 iTunes Home Sharing

iTunes Home Sharing, introducido ko ar lanzamiento iTunes 9, permite iTunes biblioteca multimedia da t'uni ja 'nar máximo ku̲t'a ordenadores conectados a través de inicio Wi — Fi wa red Ethernet. 'Nehe to. da ungumfädi ko ya bibliotecas ya nt'ot'e comunicación ja 'nar iDevice wa Apple TV. Xi transferir automáticamente 'me̲i xki comprada, películas, aplicaciones, libros, programas televisivos ja ya equipos. Ko iTunes Home Sharing, t'uni iTunes video, 'me̲i, película, nt'ot'e, libros, programas TV, fotos, etc..

Parte 1. Tange ya ya ventajas ne ya desventajas iTunes Home Sharing


Ventajas iTunes Inicio t'uni

  • 1 t'uni 'me̲i, película, nt'ot'e, libros, programas hyandi ne fotos.
  • 2 automáticamente transferir archivos nt'ot'e comprados ar computadora compartida.
  • 3. ya nt'ot'e comunicación archivos compartidos ja ya equipos ja 'nar iDevice wa 'nar Apple TV (2ª generación wa superior).

  • Desventajas iTunes Inicio t'uni

  • Hindi tsa̲ da transferir metadatos.
  • Hingi busque archivos duplicados nu'bu̲ manualmente transferir contenido ja ya ordenadores.
  • Ya actualizaciones hingi xi to transferidas ja ya equipos.

  • Parte 2. Tema configurar iTunes Home Sharing


    Requisitos:


  • Tso̲kwa menu yoho ya ordenadores-Mac wa ya Windows. Pe habilitar t'uni página asta ku̲t'a equipos ko ar xkagentho jar ID ar Apple.
  • 'Nar ID ar Apple.
  • Thuhú versión ar iTunes. Tsa̲ da descargar ár ngäts'i versión iTunes ndezu̲ web xidi mfädi Apple.
  • Red ir Ethernet wa Wi — Fi ko ya conexión Internet activa.
  • 'Nar iDevice ar da ejecutar iOS 4.3 wa 'mefa ár njäts'i Tange'u.

  • Da t'ot'e mpa̲ti inicio jar equipos

    Thogi 1: Instalar ar ngäts'i versión iTunes ne ejecutar nä'ä ja yá computadora.

    Thogi 2: Activar t'uni inicio menú archivo iTunes. Seleccione archivo nt'ot'e hontho t'uni Inicio nt'ot'e hontho t'uni Activar Inicio. Pa iTunes versión 10.7 wa elija avanzado nt'ot'e hontho Convertir jar Inicio t'uni.


    itunes home sharing


    'Nehe tsa̲ da activar ar inicio njapu'befi compartido seleccionando Inicio t'uni ja ar sección compartido ar ar barra xí lateral izquierda.

    Hñeti: Nu'bu̲ ar barra xí lateral izquierda hingi 'bu̲i visible, pe o̲t'e clic ga nt'ot'e hontho Mostrar barra xí lateral.


    itunes home sharing setup


    Thogi 3: Enter Apple ID ne contraseña ar derecha ar página marcada nu'u̲ entrar ar ID Apple gi japu̲'be̲fi pa da t'ot'e ár 'nar xe̲ni ar inicio. Nu'i gí t'ot'e utilizar ar xkagentho ID ar Apple jar ga̲tho ya equipos nä'ä gi activar t'uni ngú.


    setup itunes home sharing


    Thogi 4: 'yot'e clic jar activar t'uni ngú. iTunes comprobará ir ID Apple ne nu'bu̲ ar identificador xí válido aparecerá da ku̲hu̲ pantalla.


    how to use itunes home sharing


    Thogi 5: 'yot'e clic jar dega. Mbi 'yot'e clic jar dega, ya hingi da mar tsa̲ ndi ga t'uni ngú ja ar sección compartido ar ar barra xí lateral izquierda asta da detecta ma'na equipo ko t'uni Inicio activado.

    Thogi 6: Repita ar bi thogi 1 ar 5 ja ya equipo Temu̲ gí ne gi activar iTunes Home Sharing. Nu'bu̲ xi exitosamente activado Inicio t'uni ja ya equipo utilizando ar xkagentho ID Apple, pe ga Nunu̲ equipo ja ar sección compartido komongu tso̲kwa continuación:


    home sharing itunes


    Parte 3. Permite transferencia automática archivos multimedia


    Pa transferencia automática archivos nt'ot'e Jaki deni ya pasos nuya:

    Thogi 1: 'yot'e clic ja ar botón configuración... ja ar xeni inferior derecha ar página Mente bí visualiza ar contenido 'nar ordenador mbo ja ya cuota inicio.


    itunes home share


    Thogi 2: Da ku̲hu̲ pantalla jar Seleccione da klase ar archivos gi hegi nuna ar Hmunts'i ar transferencia automática ne 'yot'e clic jar mä hä.


    home share itunes


    Parte 4. Nu'bu archivos duplicados ma 'ra ya ComputersFiles


    Pa nu'bu archivos duplicados ndezu̲ ma'ra ordenadores dá nä'ä bí gi 'ñudi ja ar Xtí lista ya pasos nuya:

    Thogi 1: 'yot'e clic ja ar menú Mostrar ja ya 'mui inferior izquierda ar página.


    home sharing on apple tv


    Thogi 2: Seleccionar ya xe̲ni hingi ja ma biblioteca ar Nthuts'i 'be̲tho transferir ya archivos.


    itunes file sharing folder


    Parte 5. Configurar iTunes Inicio t'uni jar Apple TV


    Ma ga ga bi thogi bi bi thogi dige Honja activar t'uni ngú Apple TV jar 2ª ne 3ª generación.

    Thogi 1: Jar Apple TV seleccione equipos.


    home sharing tv


    Thogi 2: Seleccione pa habilitar Inicio t'uni utilizando ar ID ar Apple.


    itunes home sharing video


    Thogi 3: Da ku̲hu̲ pantalla jar gí encontrará da inicio t'uni xi xi habilitado nuna Apple TV.


    home sharing video


    Thogi 4: Nu'bya, ir Apple TV detecta automáticamente ya equipos mi pe̲ts'i Inicio t'uni habilitado ko ar xkagentho ID ar Apple.


    home sharing music


    Parte 6. Set Up Inicio t'uni jar iDevice


    Pa activar jár ngú compartiendo ir iPhone, iPad ne iPod ko ya iOS 4.3 wa superior deni nuya pasos:


    Thogi 1: Pulse ajustes ne seleccione 'me̲i wa vídeo da t'uni ngú. 'Me̲hna permitirá t'uni Inicio pa ga̲ yoho klase ar contenido.

    home sharing on idevice


    Thogi 2: Introduzca ar ID ar Apple ne ar contraseña. Utilizar ar xkagentho ID ar Apple nä'ä xi utilizado pa hegi nuna ar Hmunts'i mpa̲ti inicio ja yá computadora.

    Thogi 3: Pa reproducir 'me̲i wa vídeo ja ir iPhone iOS 5 wa 'mefa ár njäts'i Tange'u pulse ya mfaxte 'me̲i wa vídeos nt'ot'e hontho mäs... nt'ot'e hontho compartida. Nu'bu̲ xí utilizando 'nar versión 'be̲t'o iOS iPod toque nt'ot'e hontho mäs... nt'ot'e hontho compartido.

    Thogi 4: Nu'bya, seleccione 'nar biblioteca compartida pa reproducir 'me̲i wa videos nä'ä.

    Thogi 5: pa reproducir 'me̲i wa vídeo jar ir iPad wa iPod Touch ko ya versión 'be̲t'o iOS 5, grifo iPod nt'ot'e hontho biblioteca ne da seleccione 'nar biblioteca compartida pa 'ñeni ar nä'ä.


    Parte 7. Nä'ä iTunes Inicio t'uni ho̲e ya hingi maa


  • 1 pa activar Inicio t'uni ja ya varios equipos ya equipos tsa 'bu̲i mbo xkagentho ar red.
  • 2 pa da t'ot'e mpa̲ti inicio ya equipos gi 'bu̲i xi habilitado ko ar xkagentho ID ar Apple.
  • 3 ko 'na sola ID Apple asta ku̲t'a ordenadores tsa̲ da introducir ar jar red mpa̲ti ngú.
  • 4 t'ot'e iOS 4.3 wa 'mefa ár njäts'i Tange'u pa hegi nuna ar Hmunts'i t'uni ngú jar iDevice.
  • 5 hogar t'uni hi'nä tsa̲ da transferir wa da contenido ar audiolibros Audible.com.

  • Parte 8. t'uni 5 mäs frecuentes hñäki ko iTunes Inicio


    Q1. T'uni ngú hingi funciona 'mefa xta configurar t'uni ngú

    Njäts'i:

    1 compruebe conexión red

    2 compruebe configuración firewall ordenadores

    3 compruebe configuración Antivirus

    4 compruebe nu'bu̲ ar equipo hingi 'bu̲i jar modo ya ga ähä.


    Q2. T'uni ngú hingi funciona jar iOS dispositivo 'mefa xta actualizar ma OS X wa ya iTunes

    Njäts'i: Nu'bu̲ bí actualiza ar OS X wa iTunes Inicio intercambio signos ir nge ar ID ar Apple permite da t'ot'e Inicio t'uni. Ir permitiendo ar inicio t'uni ma 'nagi ko ar ID ar Apple da resolver ar hñäki.


    Q3. T'uni ngú ndi hingi funcionar nu'bu̲ actualiza ma iOS 7 jar windows

    Nu'bu̲ bí descarga ar iTunes, hontho llamado Bonjour Service 'nehe ar descarga. Permite aplicaciones remotas ne t'uni bibliotecas pa da utilizado ko mpa̲ti ngú. Compruebe nu'bu̲ jar 'befi xi bí nixtri ja ir windows.

    1 panel ar control nt'ot'e hontho bo̲jä nu'u̲ administrativas nt'ot'e hontho 'befi.

    2 seleccione Bonjour Service ne gí hñeti ha jar dätä hnini nuna ar 'befi.

    3 nu'bu̲ jar dätä hnini bí detiene, inicie jar 'befi o̲t'e clic derecho dige ar 'befi ne seleccionando start.

    4 reiniciar iTunes.


    Q4. T'uni ngú ndi hingi funcionar nu'bu̲ ar habilita IPv6

    Njäts'i: Deshabilitar IPv6 ne reiniciar iTunes.


    Q5. Hingi ar tsa̲ da conectar ja 'nar equipo nu'bu̲ xi modo ar ga ähä

    Njäts'i: Nu'bu̲ gi 'yo̲t'e ár computadora disponible Mente xi ga ähä modo Abra Preferencias ko ya nt'ot'e hontho Economizador ne activar opción "Despertar pa nthogi ja ar red".


    Parte 9. iTunes Inicio t'uni VS. T'uni archivos iTunes

    Inicio NTHEGE iTunes T'uni archivos iTunes
    Permite ya nt'ot'e comunicación biblioteca da t'uni ja ya varios equipos Permite da ya archivos asociados ja 'nar nt'ot'e iDevice pa transferir ar iDevice 'na jar computadora
    Requiere ar xkagentho ID ar Apple hegi nuna ar Hmunts'i mpa̲ti inicio Ningún ID Apple requiere pa transferir ar archivo
    T'ot'e ngú Wi — Fi wa conexión Ethernet Archivo mpa̲ti obras ko USB
    Hingi ar tsa̲ da transferir metadatos Conserva ya metadatos
    Asta ku̲t'a ordenadores xi ba hä jar mpa̲ti inicio Otho nuna ar límite
    Mañä